The Comprehensive Guide to Crafting Your Own VPN in 2023
Two decades back, creating your private online network meant linking two different networks using specialized hardware called VPN routers. This process involved configuring both ends of the hardware. Then came OpenVPN, streamlining the process by allowing you to set up a server and connect to it via an OpenVPN file.
However, a revolutionary solution called Tailscale has emerged, reshaping the landscape. Tailscale simplifies the intricate steps required to establish a personal VPN. It operates on an account-based model, requiring you to install an agent on your device. This innovation is a game-changer; you can dispatch the device to a remote location, connect it to the internet, and seamlessly tunnel through the Tailscale network.
This technology not only facilitates remote access to the device but also empowers you to route your connections through the device’s local network. In essence, it offers enhanced functionality in an incredibly efficient manner.
Tailscale is a versatile tool that works with nearly everything—well, at least it works wonders on all my servers and internet devices. Installing Tailscale is a breeze, making it a go-to solution for a seamless connection across all your devices.
Seamless Tailscale Integration: Unlocking Remote Accessibility and Secure Networking
This is how I employ Tailscale in my operations: First, I install Tailscale on a server that’s enabled for SSH access. Once the installation is complete, I can effortlessly establish a remote connection to the SSH server using the Tailscale network. This connection allows me to seamlessly tunnel through the network, effectively leveraging the SSH connection for enhanced connectivity.
In my approach, there’s no need to configure port forwarding on the firewall. This results in a secure setup where only those authenticated through the Tailscale network can access the internal network. This streamlined method adds an extra layer of protection to our business operations.
The Comprehensive Guide
First create an account on tailscale website. Get started for free
and then visit the download page. Get tailscale agent installer
Tailscale support many platforms:
macOS – Download Tailscale for macOS
iOS – Download Tailscale for iOS
Windows – Download Tailscale for Windows
Linux – Follow the script to install on Lniux
Android – Download Tailscale for Android
NAS
Synology – Tailscale on Synology Package center
Qnap – QNAP App Center
Unraid or FreeNAS – tailscale documentation
Upon successful installation and login to the Tailscale network using your designated account, you will be allocated an IP address within the Tailscale network. This IP address enables direct access to your device, eliminating the necessity for configuring port forwarding on the firewall. This configuration adjustment is required solely within the confines of the server’s firewall settings, thereby enhancing accessibility without compromising security.
example:
For enhanced security, your server can remain operational behind a firewall. Meanwhile, the server administration team can leverage the Tailscale network for secure access to the server via SSH tunneling.
#Connect to remote server remote.server using port 1234 and tunnel local port 8081 to visit remote server's network 192.168.0.8 server on PORT:4444
ssh adminUser@remote.server -p 1234 -N -L 8081:192.168.0.8:4444
#Example - Satble Diffusion
ssh user@192.168.38.101 -N -L 8081:127.0.0.1:7860ERROR
administratively prohibited: open failededit the following file
/etc/ssh/sshd_config

find the following line
# AllowTcpForwarding no

change it into
AllowTcpForwarding yes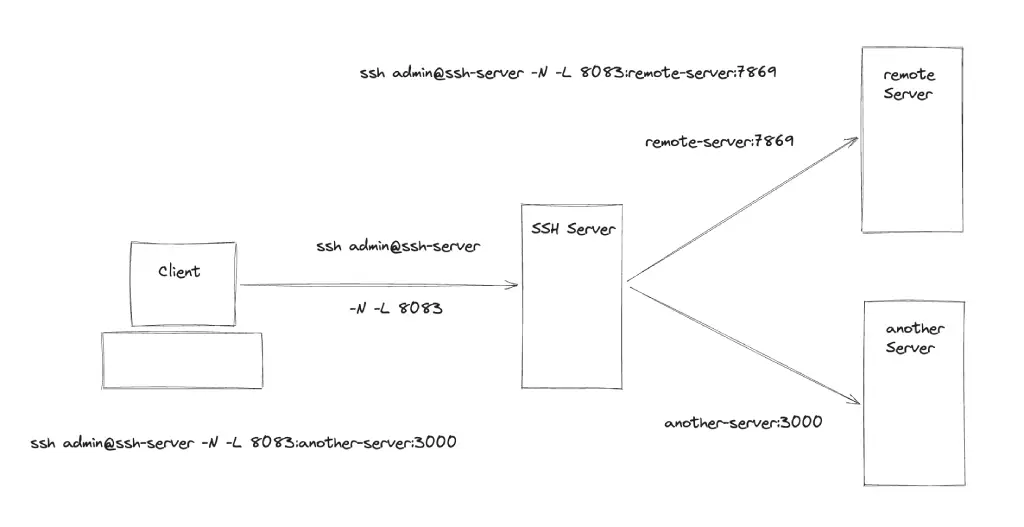
## Install OpenVPN
brew install openvpn

## To start OpenVPN now and restart at startups
sudo brew services start openvon

## Or, if you don't want/need a background service you can just run:
/opt/homebrew/opt/openvpn/sbin/openvpn --configta/opt/homebrew/etc/openvpn/openvpn.conf
and follow the steps on your mac.

# Connect server using local config file
sudo openvpn --config ~/Download/remote_server.ovpn